Download ជ្រែក មើលធ្លុះ បាញ់ក្បាល
Hack AK.rar
MediaFire is a simple to use free service that lets you put all your photos, documents, music, and video in a single place so you can access them anywhere and share them everywhere.
mediafire.com
មើលការណែនាំ
Wednesday, June 17, 2015
Saturday, June 13, 2015
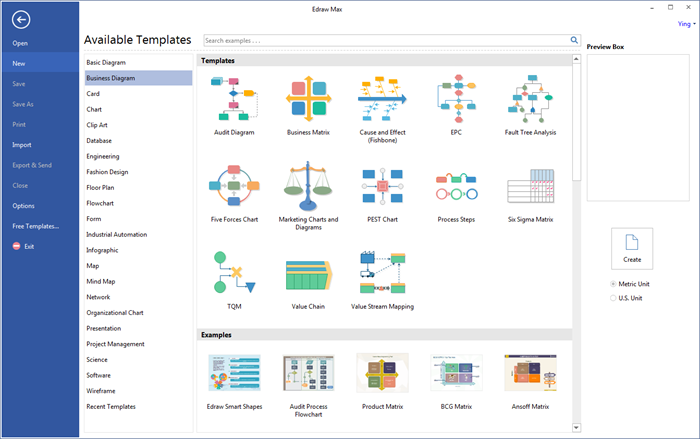
Software Interface Screenshot
The Design NetworkSoftware Start Page:


Edraw Max is an all-in-one diagram software, which can simplify the creation of over 200 types of diagrams such as business presentations, building plans, mind maps, science illustration, fashion designs, UML diagrams, workflows, wireframes, electrical diagrams, p&id diagram, directional maps, database diagrams and more. read more
Design Flowchart:

Design Mind Map:

Design Network Diagram:

How to Install Edraw Max:
Follow these steps to install
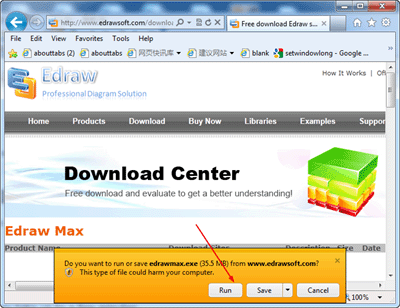
1.Depending on your connection speed, the download may take a few minutes.

Click the Run to download and run the Setup program. Or click the Save to save the setup program into your computer.
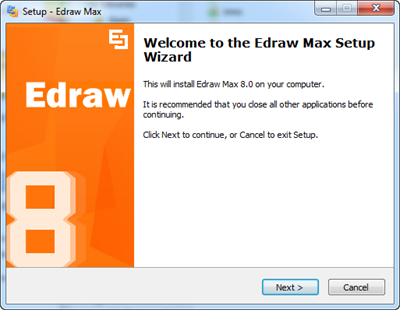
2. The Product setup wizard will be launched.
Follow the setup program to complete the installment.
3. Click the Program Desktop Icon or Start Menu to launch program.
How to Uninstall Edraw Max:
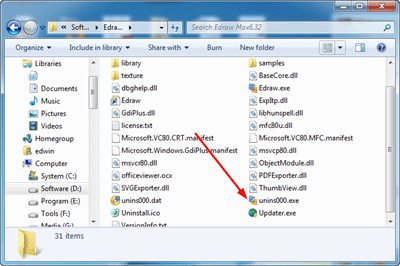
You can click the Uninst000.exe in the install folder to remove the program completely.

Friday, June 5, 2015
របៀបដំឡើង Ubuntu 12.10 ជាមួយ Windows 8 យ៉ាងងាយស្រួល ដោយប្រើ Wubi

បន្តមកទៀតនេះ ខ្ញុំនឹងបង្ហាញលោកអ្នកតាមដំណាក់កាលដូចខាងក្រោមក្នុងការប្រើប្រាស់ Wubi ដើម្បី ដំឡើងអ៊ូប៊ុនទូ ជាមួយ Windows 8 (ខ្ញុំតេស្ដលើ Windows 8) :
1/- ដំបូងបង្អស់ លោកអ្នកត្រូវចែក Drive ចេញថែម១ ទៀត ដោយប្រើ Space 20GB ឡើងទៅ (អាចតិចជាងនេះ តែខ្ញុំសូមណែនាំឲ្យប្រើ 20GB ឡើងទៅ)។
2/- បន្ទាប់មកទៀត សូមទាញយក Wubi ដោយចុចទីនេះ។
3/- ពេលនោះសូមបើវាឡើង ហើយធ្វើការកំណត់ដូចខាងក្រោម ៖
- Installation drive: Drive សម្រាប់ផ្ទុក (សូមជ្រើសរើសយក Drive ថ្មីដែលអ្នកទើបនឹងចែក)។
- Installation size: ទំហំផ្ទុក (អាចជ្រើសយក 20GB)
- Desktop environment: ប្រភេទ Desktop របស់អ៊ូប៊ុនទូ (តាមដែលអ្នកចូលចិត្ត)។
- Language: ភាសានៅក្នុងអ៊ូប៊ុនទូ របស់អ្នក (លោកអ្នកអាចជ្រើសយកភាសា Khmer ក៏បាន)។
- Username: ឈ្មោះ។
- Password: ពាក្យសម្ងាត់ (ត្រូវតែដាក់)។
*** ត្រូវច្បាស់ថា កុំព្យូទ័ររបស់លោកអ្នក មានភ្ជាប់ Internet។ :D
+++ ពេលនោះ វានឹងដំណើរការ។ សូមរងចាំវាដល់ដំណើរការចប់ (មិនត្រូវឲ្យដាច់ Internet ទេ បើដាច់ លោកអ្នកនឹងត្រូវដំឡើងវាជាថ្មីម្ដងទៀត)។
4/- ពេលដំណើរការចប់ហើយ សូម Select យក "Reboot Now" និង Finish ដើម្បីឲ្យកុំព្យូទ័រ Restart...
5/- ពេលវាបើកឡើង នឹងចេញឲ្យយើងជ្រើសរើសថា តើយើងចង់ចូលទៅដំណើរការ OS ណា?
*** បើលោកអ្នកនឿយណាយជាមួយនឹងអ៊ូប៊ុនទូ ហើយលោកអ្នកគ្រាន់តែ Uninstall Wubi ចោលចាការស្រេច។ ចង់បាន គន្លិះពីhack ចុចទីនេះ
Tuesday, June 2, 2015
របៀបចែក Hard Disk Drive នៅលើ Windows 8 បានយ៉ាងងាយស្រួលដោយមិនចាំបាច់ប្រើកម្មវិធី
ជាធម្មតា គ្រប់កុំព្យូទ័រ ទាំងអស់ យ៉ាងតិចណាស់ ក៏មាន ការចែក Hard Disk Drive ជាពីរ ផ្នែកដែរ គឺ Drive C និង Drive D។ ប៉ុន្តែសម្រាប់ កុំព្យូទ័រ របស់បងប្អូន ដែលមានទំហំ Hard Disk ធំ អាចបែង ចែកជាច្រើន Drive បាន ដើម្បីងាយស្រួល គ្រប់គ្រង ឯកសារ ហើយ ការបែងចែក Drive មានវិធីសាស្រ្ត ច្រើនណាស់ ជាពិសេស គេនិយមប្រើ កម្មវិធីមួយ ចំនួនតែម្តង ប៉ុន្តែនៅ ថ្ងៃនេះ យើងសូមបង្ហាញ ជូនប្រិយមិត្តទាំងអស់ ពីគន្លឹះងាយៗ ក្នុងការចែក Drive នៅលើ Windows 8 ដោយមិន ចាំបាច់ប្រើ កម្មវិធីនោះទេ។
ជាដំបូង បងប្អូនត្រូវចូលទៅកាន់ Run ដោយចុច Key Windows ផ្គួបជាមួយអក្សរ R ហើយនៅត្រង់ ប្រអប់ Open ត្រូវវាយ ពាក្យថា diskmgmt.msc ដូចរូប។
បន្ទាប់ពីបានវាយពាក្យ ក្នុងប្រអប់នោះ រួចហើយ ត្រូវចុចលើ OK ។ ពេលនោះ វានឹងបង្ហាញ ផ្ទាំងកម្មវិធីមួយ បង្ហាញពី Drive ដែលមាន លើម៉ាស៊ីន កុំព្យូទ័រ របស់អ្នក ហើយ បងប្អូនអាច ចាប់ផ្តើមចែក ឬ ជ្រៀក Hard Disk Drive បាន ដោយគ្រាន់តែ ចុចលើ Drive ណាមួយ រួចចុច Mouse ស្តាំ ជ្រើសរើសយក Shrink Volume ដូចរូប។
ក្រោយពេលចុចលើ Shrink Volume ហើយ វានឹងចេញនូវ ផ្ទាំងមួយនេះ តម្រូវអោយ អ្នកចែក Drive ដោយកំណត់ ទំហំ Drive ថ្មី ថាតើចង់បាន ទំហំប៉ុណ្ណា បើអ្នកចង់ បានទំហំធំ ត្រូវវាយបញ្ចូល នូវលេខគិតជា Byte ប៉ុន្តែទោះ បីជាយ៉ាងណា ក៏ដោយ ក៏មិនអាច ធំជាង ប្រភពនៃ Drive ដើមដែរ។
ជាចុងក្រោយ បងប្អូនត្រូវ ចុចលើប៊ូតុង Shrink នៅក្បែរ Cancel ហើយ រង់ចាំមួយ ភ្លែតជាការ ស្រេច។ ក្រោយពេល អនុវត្ត តាមជំហ៊ាន ទាំងអស់ នេះហើយ បងប្អូនចូល ទៅមើល ក្នុងកុំព្យូទ័រ នឹងឃើញមាន Drive ថ្មីមួយទៀត។ គួរបញ្ជាក់ ផងដែរថា លោកអ្នក ក៏អាចចែក Hard Disk Drive បានផងដែរ តាមរយៈកម្មវិធី ជាច្រើន ដូចជា កម្មវិធី AOMEI Partition Assistant ជាដើម។
Tuesday, May 26, 2015
លេខសំងាត់ដើម្បីត្រួតពិនិត្យ Android Phone មុនពេលជ្រើសរើសទិញយកមកប្រើប្រាស់
លេខសំងាត់ដើម្បីត្រួតពិនិត្យ Android Phone មុនពេលជ្រើសរើសទិញយកមកប្រើប្រាស់


សព្វថ្ងៃនេះក្នុងប្រព័ន្ធប្រតិបត្តិការណ៏ Android មានពត័មានជាច្រើនដែលលាក់ទុកក្នុង Hardware និងប្រព័ន្ធដ៏ទៃទៀតដែលយើងពិបាកក្នុងការស្វែងរកវា។ ប៉ុន្តែបើយើងដឹងនូវ លេខកូដសម្ងាត់របស់ Android អ្នកអាចកំណត់នូវទូស័ព្ទរបស់អ្នកបានយ៉ាងងាយស្រួលក្នុងការស្វែងរកអាថ៏កំបាំងរបស់ កាមេរ៉ា ទិន្នន័យបម្រុងរបស់អ្នក និងបញ្ហាជាច្រើនទៀត។
អ្នកអាចវាយបញ្ជូលកូដបានយ៉ាងងាយស្រួលដោយគ្រាន់តែ ចូលទៅក្នុងកន្លែងចុចលេខទូស័ព្ទប៉ុណ្ណោះ។ អ្នកគួរកត់សំគាល់ថា លេខកូដខ្លះវាអាចដំណើរការបានយ៉ាងជាក់លាក់ និងខ្លះទៀតវាមិនដំណើរការនោះទេនៅគ្រប់ទូស័ព្ទទាំងអស់។ ដូចនេះ ប្រសិនបើទូស័ព្ទរបស់អ្នកមិនអាចដំណើរការលេខកូដបានទេ សូមកុំព្យាយាមម្ដងទៀតអី ហើយអ្នកស្វែងលេខកូដថ្មីផ្សេងទៀត។
លេខសម្ងាត់របស់ប្រព័ន្ធប្រតិបត្តិការ Android សំរាប់ Generic
- *#06# - ការឆែកមើលលេខ IMEI របស់ទូស័ព្ទអ្នក (ករណីដែលទូស័ព្ទរបស់អ្នកត្រូវបានលួចហើយអ្នកចង់រារាំងដំណើរការរបស់ចោរពីបណ្ដាញរបស់អ្នកទៅ)
- *#*#7594#*#* - ធ្វើអោយទូស័ព្ទរបស់អ្នក បិទ(រលត់) ដោយមិនចាំបាច់ប្រើប្រាស់ប៊ូតុង
- *#*#4636#*#* - បង្ហាញពត័មានអំពីទូស័ព្ទរបស់អ្នកនូវ ភាគរយថ្ម ការប្រើប្រាស់ និង Wifi
- *#*#7780#*#* - កំណត់ទិន្នន័យឡើងវិញទាំងអស់ (ការលុបទិន្នន័យពីកម្មវិធី និងកម្មវិធីដែលមិនមែនជា firmware)
- *2767*3855# - លុបសំអាតទូស័ព្ទរបស់អ្នក, រួមបញ្ចូលទាំងកម្មវិធីដែលមិនបានការ (មិនត្រូវបានប្រើប្រាស់!)
- *#*#273283*255*663282*#*#* - រក្សាទុករូបភាព នឹងវីដេអូរបស់អ្នក
- *#*#1472365#*#* - សាកល្បងប្រើប្រាស់ GPS
- *#*#1234#*#* - បង្ហាញ firmware របស់ទូស័ព្ទនិងព័ត៌មានទូរស័ព្ទជា PDA

អ្នកអាចចូលទៅអេក្រង់ខាងលើនេះដែលឧបករណ៍ Android ភាគច្រើនបំផុតប្រើប្រាស់សំរាប់ការបញ្ចូល * #
- * # 4636 # * # * នៅលើផ្ទាំង dialpad នេះ។
- *#*#232338#*#* - បង្ហាញពីទីតាំងរបស់ Wifi
- *#*#8255#*#* - ចូលទៅដំណើរការរបស់ GTalk
- *#*#36245#*#* - ចូលទៅកាន់ព័ត៌មានរបស់អ៊ីម៉ែល
- *#*#225#*#* - ប្រាប់ពីព្រឹត្តិការណ៏របស់ប្រតិទិន
- *#*#426#*#* - ប្រាប់អំពីព័ត៌មានសម្រាប់ Google Play
- *#*#759#*#* - ការចូលទៅកាន់ដំណើរការរៀបចំដៃគូរបស់ Google
លេខកូដអាថ៏កំបាំងរបស់ទូស័ព្ទ Samsung
មនុស្សជាច្រើនបានប្រើប្រាស់លេខកូដខាងលើនេះក៏ នឹងហើយវាក៏បានដំណើរការនៅលើ ទូស័ព្ទរបស់ក្រុមហ៊ុន Samsung ប៉ុន្តែយើងត្រូវបានធ្វើតេស្តកូដខាងក្រោមនេះជាពិសេសទៅលើ ទូស័ព្ទរបស់ Samsung ហើយយើងអាចបញ្ជាក់ថាពួកចវាអាចដំណើរការបាន។
- *#*#34971539#*#* - បង្ហាញអំពីពត័មានរបស់កាមេរ៉ា
- *#*#197328640#*#* - បើកអោយដំណើរការ mode for services
- *#*#232339#*#* - សាកល្បង Wireless LAN
- *#*#1575#*#* - សាកល្បង GPS របស់អ្នក (វាអាចជំនួសទៅនឹងការធ្វើតេស្តប្រព័ន្ធ GPS នៃ ប្រព័ន្ធប្រតិបត្តិការ Android ទូទៅ)
- *#*#0*#*#* - សាកល្បង LCD display របស់អ្នក
- *#*#4986*2650468#*#* - បង្ហាញពីព័ត៌មានទូរស័ព្ទដ៏សំខាន់មួយ (PDA, Hardware, firmware etc.)
- ##778 (អនុវត្តតាមប៊ូតុង Call) - ម៉ឺនុយ EPST
លេខកូដអាថ៏កំបាំងរបស់ទូស័ព្ទ HTC

ទូរស័ព្ទ HTC ដូចជា One M9 អាចប្រើប្រព័ន្ធប្រតិបត្តិការ Android ម៉ាស៊ីន Generic សម្ងាត់ដែលបានរាយខាងលើនោះទេប៉ុន្តែក៏មានមួយចំនួននៃកូដផ្ទាល់ខ្លួនរបស់វាដែល៖
- *#*#3424#*#* - កម្មវិធីធ្វើតេស្តមុខងាររបស់ក្រុមហ៊ុន HTC
- *#*# - ម៉ឺនុយពត័មានរបស់ HTC
- *#*#8255#*#* - បើកអោយដំណើរការ Gtalk Service
- ##3424# - របៀបធ្វើការវិនិច្ឆ័យ
- ##3282# - ម៉ឺនុយ EPST
- ##8626337# - VOCODER
- ##33284# - ម៉ឺនុយសំរាប់សម្អាត
- ##786# - ផ្ទុកសំភារៈចាស់ៗ
- ##7738# - ឆែកមើលពិធីការ

ការធ្វើតេស្តមុខងារម៉ឺនុយនៅលើក្រុមហ៊ុនទូរស័ព្ទ HTC ត្រូវវាយ ## 3282 # នៅលើ dialpad នេះ។
Monday, May 25, 2015
Sunday, May 24, 2015
Weekend Box Office 2015 "ZHONG KUI" Chinese Martial Arts Movies 2015 Full Movies
Weekend Box Office 2015 "ZHONG KUI" Chinese Martial Arts Movies 2015 Full Movies
Thursday, May 21, 2015
Internet Download Manager 6.23 Build 12
Internet Download Manager 6.23 Build 12

តើមានអ្វីថ្មីនៅក្នុងកំណែ 6.23 Build 12?
- បន្ថែមនូវការគាំទ្រសម្រាប់ Google Chrome 42
- បន្ថែមនូវការគាំទ្រសម្រាប់ Mozilla Firefox 37
- បន្ថែមនូវការគាំទ្រសម្រាប់ប្រភេទថ្មីនៃវីដេអូ Streaming Sites
- បានជួសជុលបញ្ហា
មួយនេះដំណើរការ! គ្មានការព្រមានសៀរៀលក្លែងក្លាយមកទល់ពេលនេះ
- បន្ថែមនូវការគាំទ្រសម្រាប់ Google Chrome 42
- បន្ថែមនូវការគាំទ្រសម្រាប់ Mozilla Firefox 37
- បន្ថែមនូវការគាំទ្រសម្រាប់ប្រភេទថ្មីនៃវីដេអូ Streaming Sites
- បានជួសជុលបញ្ហា
មួយនេះដំណើរការ! គ្មានការព្រមានសៀរៀលក្លែងក្លាយមកទល់ពេលនេះ

ទំហំឯកសារ: 7.58MB
Wednesday, May 20, 2015
How to Take Screenshots
How to Take Screenshots
In this lesson you'll learn how to take a screenshot, and how to crop that image down to size. For example, suppose you were getting an error message on screen and wanted to send it to us to see if we could help. Instead of typing the error message, or trying to explain it, you could take a screenshot, crop to reduce the file size, and then insert the image into your email. Here's how.
First, you need to locate the Prt Scrn button on your keyboard. This stands for Print Screen, and is usually located on the right hand side of a standard keyboard, just above the Insert,Home and Page Up keys. However, if you have a laptop, the Prt Scrn button can be hard to locate. Look in the very top right of your keypad. Not only that, you may have to hold down your laptop's function key first, which is usually found in the bottom left of the keypad.
Press the Print Screen button once on a PC, or use the Function Key > Print Screencombination on a laptop. This will copy whatever you see on your screen to the computer's memory. Once the screen is in the computer's memory it can be pasted into an image editor for manipulation.
The image editor we'll use is Paint. This has been much improved with Windows 7 and can be found by clicking your Start button. From the Start menu click All Programs at the bottom:

Now click on Accessories, and Paint:

When Paint starts up, click the Paste button at the top:

The image you captured on the desktop should now appear in the main viewing area. If it doesn't, it means you haven't captured the image. So try pressing your "Prt Scrn" button again.
You now need isolate just that part of the image you're interested in. After all, there's no sense in sending anyone the whole of the screen when you only want to capture the error message.
To isolate just part of the screen, click the Select button on the Paint toolbar:

Now move your mouse back on to your image. The cursor should have changed shape. Hold down your left mouse button on the top left of whatever it is you're trying to capture. Keep your left mouse button held down and drag to the bottom right. In the image below, we're trying to isolate some code and the error message:

Unfortunately, Paint is not very good when it comes to resizing a selected area. You might think the white squares are sizing handles. But if you hold your mouse over one and try to drag to a new position it will cut and move the image instead. It's better if you press the Select button again. This will deselect your chosen area, and you can have another go.
If you accidentally move your selected area, click the Undo icon at the very top left of Paint:
Once you have a selection, right-click this area and you'll see a menu appear. Select Crop, and the image will shrink to your selected area:

Paint is also not very good at refining the cropped area, either. If you want better screenshots then you would need a decent image editor like the free Gimp (which is quite hard to use). Photoshop Elements is also a very good image editor, and is well worth paying money for. The best professional image editor is Photoshop, (Elements is a stripped down version of this), but it's quite expensive.
For quick screenshots and basic cropping, however, Paint should be fine.
Once you have cropped your image down to size, you can save it by clicking the dropdown menu at the top:

From the menu, select Save As to see the following options:

As you can see, there is a bewildering array of options! If you want to keep the file size down to a minimum, use GIF or PNG. (GIF is the more common of the two.) For better quality images, but large file sizes, use JPEG. If you're sending somebody a screenshot in an email, GIF is the better option.
But you should now know how to take a screenshot, and crop the image in Microsoft Paint.
Hard Drive Basics
Hard Drive Basics
The Hard Drive on your computer is where all your files are stored. Not only that, it's the place where the Operating System itself is installed. A hard drive is a physical thing inside of your computer. If you were to take it apart, you'd see one of more disks (called platters), one on top of the other. In a modern hard drive, however, there's usually just one platter. The disks are magnetised and can be written to and read from. The writing and reading is done by an arm which moves across as the disk is spun round. If you were buying a new hard drive, you'd see a figure like 7,200 rpm (revolutions per minute) or 10, 000 rpm. This refers to the speed at which the disks spin. The higher the spin speed the faster the hard disk will be.


The Hard Drive on your computer is where all your files are stored. Not only that, it's the place where the Operating System itself is installed. A hard drive is a physical thing inside of your computer. If you were to take it apart, you'd see one of more disks (called platters), one on top of the other. In a modern hard drive, however, there's usually just one platter. The disks are magnetised and can be written to and read from. The writing and reading is done by an arm which moves across as the disk is spun round. If you were buying a new hard drive, you'd see a figure like 7,200 rpm (revolutions per minute) or 10, 000 rpm. This refers to the speed at which the disks spin. The higher the spin speed the faster the hard disk will be.
Not all hard drives use the spinning disk and arm approach, however. A modern laptop or Netbook may use something called a Solid State Drive (SSD). These have no moving parts, and are considered faster than a hard drive. However, the space available on a SSD is a lot less than on a hard disk, but this could change over the next few years or so. At the moment, SSDs are lot more expensive than hard drives. But again, this could change.
Whichever drive you have, hard or Solid State, just bear in mind that a drive is a physical thing that you use to store files, install programmes and Operating Systems.
The size of a hard drive does not refer to its height or width but to how many Gigabytes of data can be stored on it. If you're wondering how big a Gigabyte is then think of a single byte as holding, say, one letter of the alphabet. A kilobyte can then hold a thousand letters (actually, 1024 letters as there's just over a thousand bytes in a kilobyte). A Megabyte could hold 1, 000, 000 letters (1, 048, 576 bytes), and a Gigabyte 1000, 000, 000 letters (1 073, 741, 824)!
The size of a hard drive does not refer to its height or width but to how many Gigabytes of data can be stored on it. If you're wondering how big a Gigabyte is then think of a single byte as holding, say, one letter of the alphabet. A kilobyte can then hold a thousand letters (actually, 1024 letters as there's just over a thousand bytes in a kilobyte). A Megabyte could hold 1, 000, 000 letters (1, 048, 576 bytes), and a Gigabyte 1000, 000, 000 letters (1 073, 741, 824)!
But those numbers are fairly meaningless in modern-day computing. Think of how big a picture is that you take on a camera phone. A medium sized image will be about 250 kilobytes. So you could get four if the memory held only a megabyte and about 4 000 if you had a Gigabyte of memory on your phone.
You can check to see how big the hard drive is on your own computer. To do that, start up Windows Explorer by clicking its icon just to the right of the Start button:
When Windows Explorer starts, you'll see this screen:

The default location is inside of the Libraries folder. Click the Computer section instead:

You'll then see this:

This area should display a graphic of how much space you have left on your hard drive, and how big it is. In the image above, this computer has a hard drive size of 465 Gigabytes (GB), and there is still a roomy 410 Gigabytes of space free to use. The image also shows other drives attached to the computer, a DVD writer in this case. If you have a USB memory stick, it should show up here when it is inserted.
Note also that the drive has the name Local Drive (C:), or just the C Drive for short. This C Drive is also known as the root drive, as everything is stored on it. Think of it as the master folder that holds all other folders and files inside of it.
Now click on the C drive to highlight it. You should see some extra option become available at the top:

The one we're interested in is the Properties option. Click on this and you'll see a dialogue box appear. This one:

Again, we see a graphic of how big the hard drive is, and how much space is free. The graphic this time is a pie chart.
One thing to note here is that the size of the hard drive is 465 Gigabytes, even though it was marketed as having a 500 gigabyte hard drive. So why the discrepancy? It's because the manufactures uses a small "g" for gigabytes, and they use 1 gigabyte to mean a billion bytes. However, a true Gigabytes has a capital "G" and means 1 073, 741, 824 bytes. So a 500 Gigabyte hard drive actually has 35 GB missing!
Hard Disk Cleanup
If your hard drive is showing a lot of used space, and not much free space, then click the button "Disk Cleanup" to see if you can rescue some space. You should then see a small dialogue box like this one:

When Windows has finished its calculation, you'll then see this:

Disk Cleanup is telling us that it has found 90.0 Megabytes of files that it can safely delete. These are the ones with check marks. You can check any of the other boxes, as well. For example, the image above shows that the Recycle Bin has 1.97 GB of files in it. If you're sure you haven't accidentally sent an important file to the Recycle Bin then you can safely delete these files as well. In which case, give it a check mark by clicking inside of its box. The same applies to all the others on the list (scroll down to see more). Click on an item to see a description of just what each item on the list does.
You can also click the button at the bottom "Clean up system files". All this does is to add even more areas to the list. But you need to delete the system files with care. If you're not sure about an area, leave it unchecked.
When you're happy with your selections, click the OK button to free up disk space. Windows will then go to work erasing the files and documents you have selected. When it's done, it will return to the Disk Cleanup screen:

In the image above, we're freed up 2 Gigabytes of space.
Another area worth exploring in the image above is Tools. Click this tab at the top to see the following screen:

You only need to click the Error-checking option if you've been having a few problems with your computer. Otherwise, you can leave it alone. TheDefragmentation option is really a matter of choice. If you have a big hard drive with lots of space, there's little point in defragmenting. It's supposed to speed up file access times, but is really only relevant on older hard drives that don't have much free space. The Backup option is worth exploring. When you click the button, Windows will search your computer for other drives, like DVD writers. If it finds one, it will ask you to use that to backup your files. More expensive versions of Windows 7 will have better options for back up, like a network drive. You should always back up your important files and documents, but cheaper versions of Windows 7 are not that much help - you could easily copy your files to a DVD yourself, without Window's help!
Windows SuperAIO v3 83-in-1 Dec2013 Full Version
Widnows 8.1 Pro vl x86
Widnows 8.1 Pro vl x64
Windows 7 Sp1 Ultimate x86
Windows 7 Sp1 Ultimate x64
Window 2 ក្នុង Bootable តែមួយ !

Name :- Windows Super AIO may2015
Architecture :-x86x64
Assembly :- this iso have 2 32bit and 2 64bit versions added of windows
Widnows 8.1 Pro vl x86
Widnows 8.1 Pro vl x64
Windows 7 Sp1 Ultimate x86
Windows 7 Sp1 Ultimate x64
Size:- 7.98gb
Language :- English
Activation:- no, use given Activator
Updates:- Included all new updates of May 2015
Author :- Team OS
Added/Removed:- Nothing , its a whole iso with all new Updates of May.
CRC32: 8DB2E815
MD5: 862807B56927BE6B1784607215CD9B61
SHA-1: F4D0AE2A525359DA41C89F537ADA9CAE38117BD2


Download នៅទីនេះ
Widnows 8.1 Pro vl x64
Windows 7 Sp1 Ultimate x86
Windows 7 Sp1 Ultimate x64
Window 2 ក្នុង Bootable តែមួយ !

Name :- Windows Super AIO may2015
Architecture :-x86x64
Assembly :- this iso have 2 32bit and 2 64bit versions added of windows
Widnows 8.1 Pro vl x86
Widnows 8.1 Pro vl x64
Windows 7 Sp1 Ultimate x86
Windows 7 Sp1 Ultimate x64
Size:- 7.98gb
Language :- English
Activation:- no, use given Activator
Updates:- Included all new updates of May 2015
Author :- Team OS
Added/Removed:- Nothing , its a whole iso with all new Updates of May.
CRC32: 8DB2E815
MD5: 862807B56927BE6B1784607215CD9B61
SHA-1: F4D0AE2A525359DA41C89F537ADA9CAE38117BD2


Download នៅទីនេះ
Subscribe to:
Posts (Atom)


